iOS持续集成
通过持续集成,可以让我们通过自动化手段高频率地去获取产品反馈并响应反馈的过程。iOS可持续化集成应该包含3个基本模块:
- 一个可以自动构建的过程,自动编译代码,可以自动分发,部署和测试
- 一个代码仓库,SVN或者Git
- 最后一个是一个持续集成的服务器
在做iOS可持续化集成需要用到以下工具:bundler、fastlane、Jenkins、ipapk-server
# bundler
bundler用于管理ruby gem的工具,我们用来管理cocoapods以及fastlane的版本号。
安装:sudo gem install -n /usr/local/bin bundler
使用:在工程的根目录下,添加Gemfile文件(也可以指定版本号)
source 'https://gems.ruby-china.org/'
gem 'cocoapods'
gem 'fastlane'
gem 'dotenv'
#gem 'fastlane', '~>2.35.1'
2
3
4
5
然后执行bundle install,执行完同时会生成一个Gemfile.lock文件,把这个文件一起添加到git中管理,用这个我们可以很方便大家一起同步gem source和CocoaPods以及fastlane的版本号。
# fastlane
# fastlane介绍
Github地址:https://github.com/fastlane/fastlane (opens new window)
fastlane是一组工具套件,让你可以定义和运行特定环境下各种部署流程的自动化,它是由fastlane提供的工具(例如snapshot/sigh/deliver等)以及各种第三方工具(例如cocoapods/xctool等)连接在一起组成的,可以提供一个运行良好的可持续部署流程。如下图,在Test / TestFilght Beta /Appstore 这些不同的环境下,运行的部署流程是不一样的。
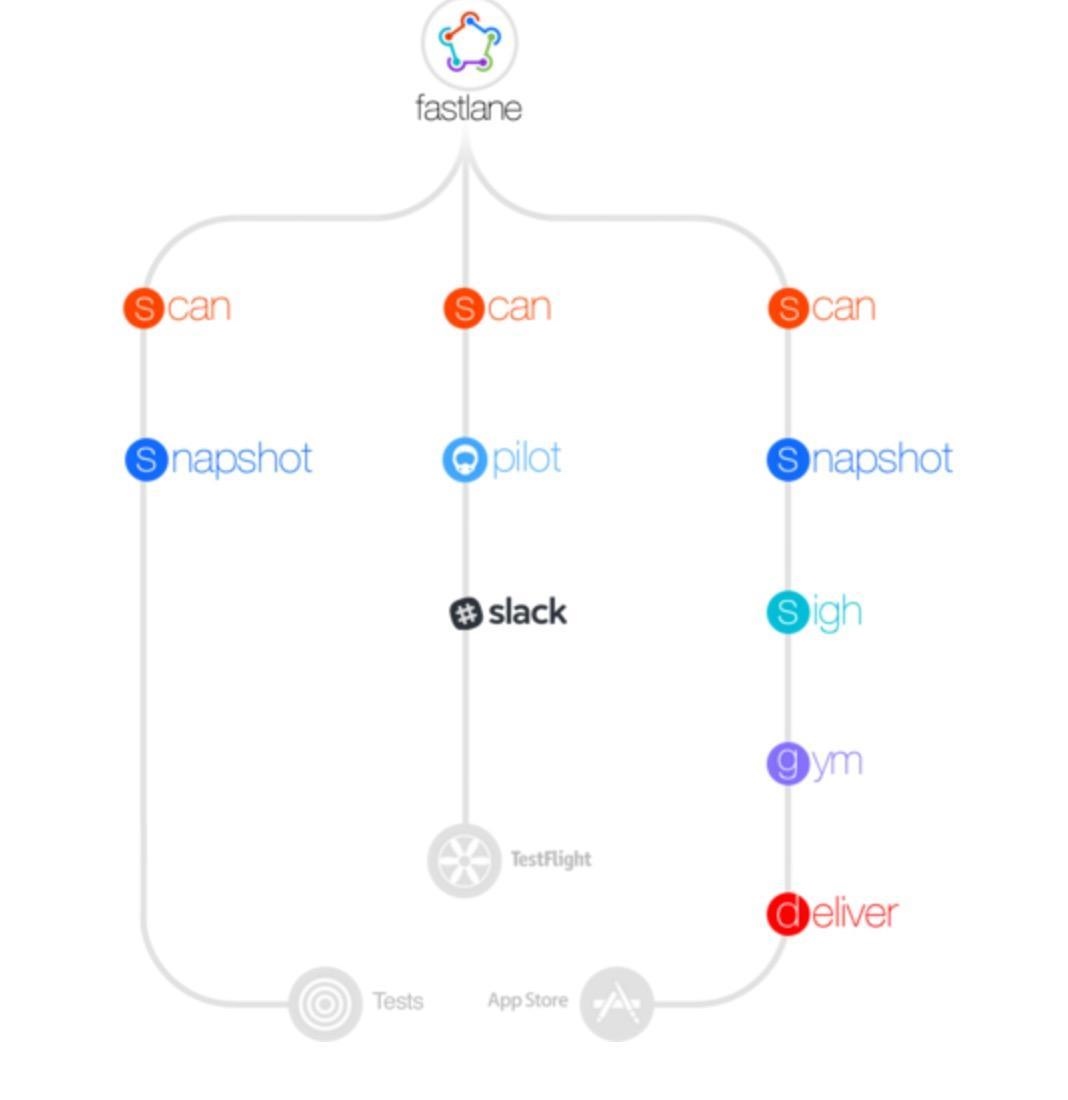
fastlane提供的各种工具:
- deliver: 上传截图, 元数据, app应用程序到App Store
- supply: 上传Android app应用程序和元数据到Google Play
- snapshot: 自动捕获iOS app应用程序本地截图
- screengrab: 自动捕获Android app应用程序本地截图
- frameit: 快速截屏并将截屏放入设备中
- pem: 自动生成和更新推送通知配置文件
- sigh: 开发证书和描述文件下载
- produce: 使用命令行在iTunes Connect上创建新的app和开发入口
- cert: 自动创建和配置iOS代码签名证书
- spaceship: Ruby 库访问 Apple开发者中心和 iTunes Connect
- pilot: 最好的方式管理你的TestFlight 测试人员和从终端构建
- boarding: 最简单的方式邀请你的TestFlight beta测试人员
- gym: iOS app打包签名自动化工具
- match: 使用Git同步你的团队证书和配置文件
- scan: 最简单方式测试你的 iOS 和 Mac apps
# fastlane安装
首选确认安装最新版本的Xcode command line,安装过最新的XCode,就会携带安装最新的Xcode command line,或者使用一下命令:
xcode-select --install
安装方法
| Homebrew | Installer Script | Rubygems |
|---|---|---|
| macOS | macOS | macOS or Linux with Ruby 2.0.0 or above |
brew cask install fastlane | Download the zip file (opens new window) Then double click on the install script (or run it in a terminal window). | sudo gem install fastlane -NV |
# 相关教程
https://www.raywenderlich.com/136168/fastlane-tutorial-getting-started-2 (opens new window)
https://docs.fastlane.tools/ (opens new window)
# fastlane基本使用
# fastlane init
此命令会要去输入Apple ID,fastlane会根据提供的信息自动生成配置文件Appfile,Fastfile
AppleId 有二次验证的话,需要在为apple id设置 application specific password。
- 访问地址:appleid.apple.com/account/manage
- 生成一个新的 application specific password
- 在Fastfile文件中或者.env文件中配置环境变量 FASTLANE_APPLE_APPLICATION_SPECIFIC_PASSWORD = "xxxxxx"
# import fastfile
在仓库: https://github.com/wanyakun/fastlane (opens new window) 中存放了基本的通用fastfile和Action,在使用的时候可以使用import的方式来使用。下面举例说明:
发布组件
import_from_git(
  url: 'https://github.com/wanyakun/fastlane.git',
  branch: 'master'
)

fastlane_version "2.37.0"

default_platform :ios

platform :ios do
	lane :publish do |options|
		version = options[:version]
		yk_component_release_static_lib(
			version:version,
			project:'XXXBIZCommon'
		)
	end
end
2
3
4
5
6
7
8
9
10
11
12
13
14
15
16
17
18
19
发布测试App
import_from_git(
  url: 'https://github.com/wanyakun/fastlane.git',
  branch: 'master'
)

fastlane_version "2.37.0"

default_platform :ios

platform :ios do

  desc "public a adhoc beta app to testflight"
  lane :adhoc do |options|
    fastlane_require 'dotenv'

    unlock_keychain(
      path: ENV['MAC_KEYCHAIN_PATH'],
      password:ENV['MAC_USER_PASSWORD']
    )

    xcodeproj = './Demo/Demo.xcodeproj'
    scheme = 'Demo'

    build_number = options[:build_number]
    unless build_number
      build = get_build_number(xcodeproj: xcodeproj).to_i + 1
      build_number = build.to_s
    end

    yk_app_build(
       app_identifier: 'com.aioser.Demo',
       app_extension_identifier: 'com.aioser.Demo.NotificationServiceExtension',
       scheme: 'Demo',
       configuration: 'debug',
       derived_data_path: 'derivedData',
       output_directory: 'output',
       output_name:'Demo.ipa',
       build_number: build_number,
       xcodeproj: xcodeproj,
       testflight: true,
       use_match: true,
       manual_publish: false,
       pid: 0,
       cer_git_url: xxxx,
       cer_git_branch: 'master',
       ipapkserver_ip: '192.168.199.100',
       ipapkserver_port: 1234
    )
  end
end
2
3
4
5
6
7
8
9
10
11
12
13
14
15
16
17
18
19
20
21
22
23
24
25
26
27
28
29
30
31
32
33
34
35
36
37
38
39
40
41
42
43
44
45
46
47
48
49
50
# 使用Match
Match用于使用git同步证书、provisioning profile文件,使用fastlane match init 命令会创建Matchfile文件,并要求输入一些配置。
git_url "https://github.com/wanyakun/fastlane.git"

type "adhoc" # The default type, can be: appstore, adhoc, enterprise or development

app_identifier "com.aioser.Demo"

username "wanyakun@vip.qq.com" # Your Apple Developer Portal username

git_branch "plateform"
2
3
4
5
6
7
8
9
配置完后可以通过以下命令自动同步证书和profile文件。
fastlane match development

fastlane match appstore

fastlane match adhoc
2
3
4
5
也可以通过此命令注册新的设备,废弃证书和provisioning profile等。 更多信息参考:https://github.com/fastlane/fastlane/blob/master/match/README.md (opens new window)
# 使用cert和sigh
如果不实用match,可以直接使用cert和sigh两个action
begin
 cert(username: ENV['FASTLANE_USER'])
 sigh(username: ENV['FASTLANE_USER'], app_identifier: app_identifier, adhoc: true)
rescue => e
 puts e.message
end
2
3
4
5
6
# .env
配置一些环境变量,可以根据不同的环境配置不同的环境变量文件如:.env.adhoc、.env.development、env.appstore,这些文件是隐藏的。
APP_IDENTIFIER = "com.aioser.Demo" #
#苹果开发者账号
FASTLANE_USER = "wanyakun@vip.qq.com"
#证书仓库解密密码
MATCH_PASSWORD = "123.com"
#开通二次验证后,苹果开发者账号的Special password
FASTLANE_APPLE_APPLICATION_SPECIFIC_PASSWORD = "nvby-npho-sesg-whim"
#team id
DEVELOPMENT_TEAM = "4V78YDRYZW"
#Profile Name
PROVISIONING_PROFILE_SPECIFIER = "match AdHoc com.aioser.Demo"
#codesigning_identity
CODESIGNING_IDENTITY = "iPhone Distribution: Shanghai XXX XXX Information Services Co.,Ltd. (4D78ZDRYZW)"
#Mac user password
MAC_USER_PASSWORD = "123.com"
#keychain path
MAC_KEYCHAIN_PATH = "login.keychain-db"
2
3
4
5
6
7
8
9
10
11
12
13
14
15
16
17
更多封装好的用法参照:https://github.com/wanyakun/fastlane (opens new window)
# Jenkins
Jenkins配置比较简单,网上教程非常多。
针对我们的项目,由于已经使用了fastlane,所以不需要进行其他证书、profile、login.keychain等配置。只需要配置好git地址,在构建步骤中添加Execute shell
由于测试需要,目前构建默认全是Debug包,也可以在项目中的fastfile中配置Configration为Release
构建Debug包并上传到内测分发系统:
#!/bin/bash -l
fastlane yk_app_build build_number:${BUILD_NUMBER}
2
构建Debug包并上传到TestFlight,若上传到TestFlight,只需要增加参数 testflight: true 即可。
#!/bin/bash -l
fastlane yk_app_build build_number:${BUILD_NUMBER} testflight: true
2
# 常见问题
# 命令行找不到scheme问题
直接拉取代码到本地之后,通过命令xcodebuild -list找不到scheme(通过xcode打开后即可找到)
由于需要通过Jenkins进行持续构建,拉取代码后必须通过命令行打包,因此手动打开xcode显然不现实。解决方法如下:
- 事先通过xcode打开工程,通过Scheme > Manage Schemes ,将scheme设置为shared:
- 将生成的文件xx.xcodeproj/xcshareddata提交到代码版本库。
- 通过Jenkins等工具拉取代码之后,即可找到scheme
# PhaseScriptExecution [CP]\ Embed\ Pods\ Frameworks
钥匙串秘钥访问权限问题,修改访问控制为“允许所有应用程序访问此项目”
# Jenkins执行pod repo udpate 私有库
当我们在Jenkins中执行shell命令来update私有库的时候,或者match的时候,需要使用到keychain中的用户名和密码,会出现找不到UserName,这是因为用户名和密码保存在login keychain中。这个时候只需要unlock login keychain才可以,找到~/Library/Keychains/目录下login.keychain或者login.keychain-db,在before_all中添加
    unlock_keychain(path: "login.keychain-db",
                    password:ENV['MAC_USER_PASSWORD'])
2
其中MAC_USER_PASSWORD为.env中配置的Mac登录用户的密码。
# Code signing is required for product type 'Application' in SDK 'iOS 10.3'
这种问题一般是Xcode中签名配置问题,或者XCode中没有登录开发者账号。
# error: exportArchive: No 'teamID' specified and no team ID found in the archive
这个错误是在Jenkins中执行fastlane命令是遇到的。
在命令行或者Xcode进行Archive的时候,可以查看.xcarchive文件,SigningIdentity的值为我们在Xcode中配置的值,或者是通过fastlanefile中配置的值。
而在Jenkins中配置这个命令后,会出现上面的错误,同样的,查看.xcarchive文件,发现SigningIdentity的值为(unavailable),导致在export的时候出现错误。
根本原因是:Apple Worldwide Developer Relations Certification Authority证书不在system keychain中,将其添加到system keychain中即可
# TestFlight
TestFlight必须使用发布证书、Appstore的profile,使用Adhoc无法进行testing
Because your CI machine will not be able to prompt you for your two-step or two-factor auth information, you also need to generate a login session for your CI machine in advance. You can get this by running:
fastlane spaceauth -u wanyakun@vip.qq.com
This will generate a token you can set using the FASTLANE_SESSION environment variable on your CI system.